In this gallery you can see photos of my creations made between March 2008 and June 2009. These photos were on another blog that they are almost about to close, so I decided to move here at least some of these photos of my creations. After the photo gallery you can also see some work in progress of these creations.
So let's start with the gallery of fairies:


Let's see some witch:


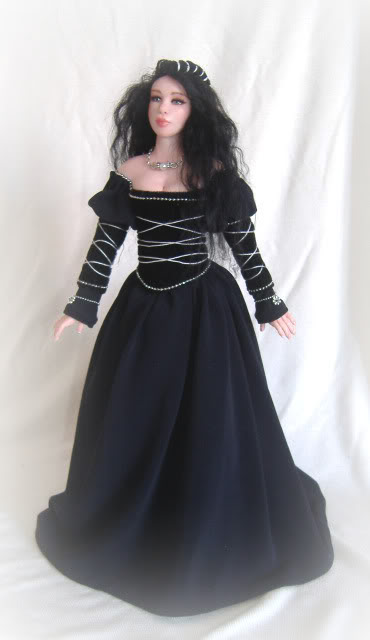
And then a sweet damina:


And finally a character of fairy tales:


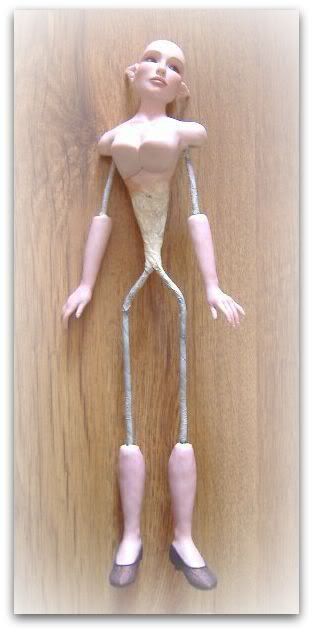
Ho deciso di provare a creare una fata ancora più grande, questa sarà una fata che alla fine misurerà in altezza circa 40 cm. e sarà anche questa una posable doll cioè le parti modellate con la pasta sintetica in questo caso sono, la testa e il mezzo busto, metà braccia e poi le mani, metà gambe e poi i piedi.
Il resto del corpo viene creato con una specie di ovatta sintetica. Alla fine la scultura potrà stare in piedi grazie a un supporto per bambole, che comunque non si vedrà perché the fairy will have a long dress and broad, or if you want you can also put it in the sitting position and then you can bend your legs and arms is also wanting this peculiarity of these sculptures that the English people call just posable doll.
usually far I have always done my "posable dolls" barefoot, but for this I decided to try for the first time to make shoes. I hope! However
below you can see some stages of production of this fairy. Obviously this post will be a constantly updated until you reach the final stage of creation. So if you're curious to see the end as you will be my fairy sometimes switch to snoop on my blog!
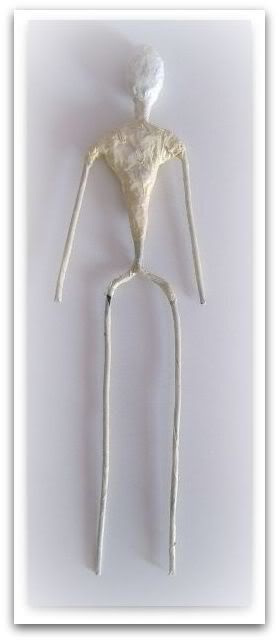
Just to give you an idea we start to shape by a support like this that you can see below.
were inserted glass eyes brown.
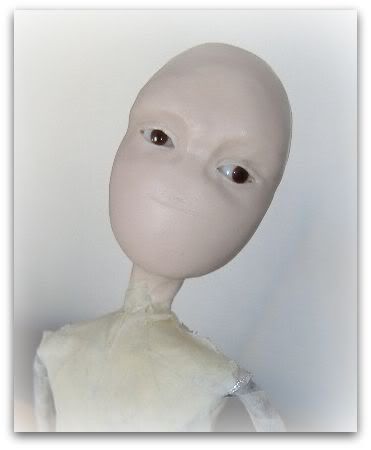
below are already some way forward in the work, and the nose is made even half mouth.

And see with your ears ready to be placed in the oven.
But here is just out of the oven.


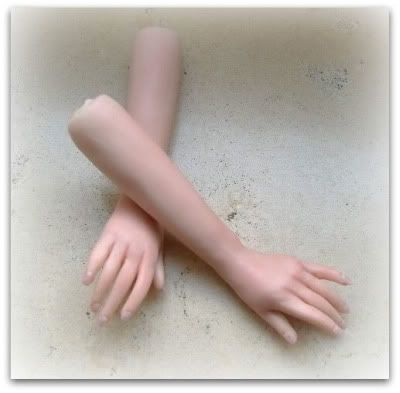
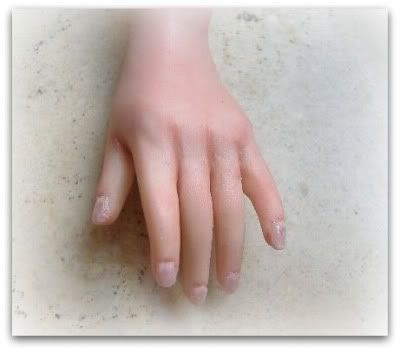
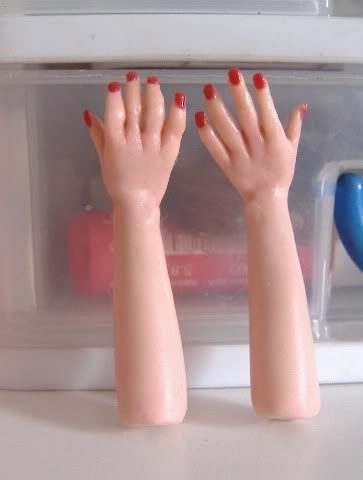
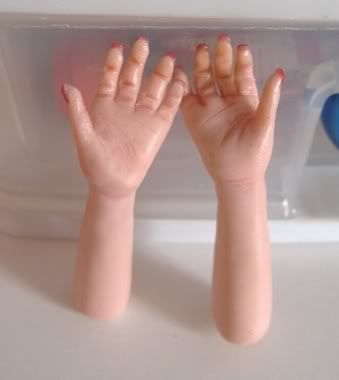
Then I switched to working hands. I have not done any pictures, because I was so taken in processing that I simply forgot about them! Make your hands is very difficult, not that the rest is easy to do, but at least for me, the stage hands are always very stressful! However, below you can see his hands over.
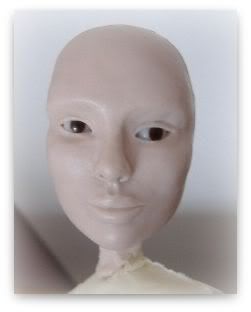
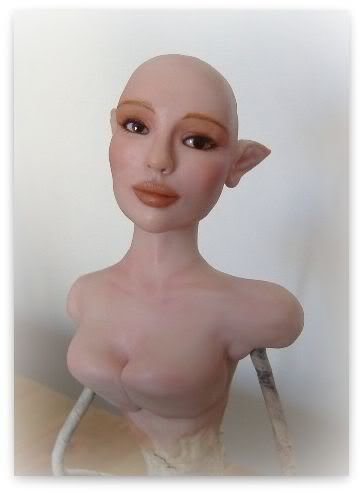
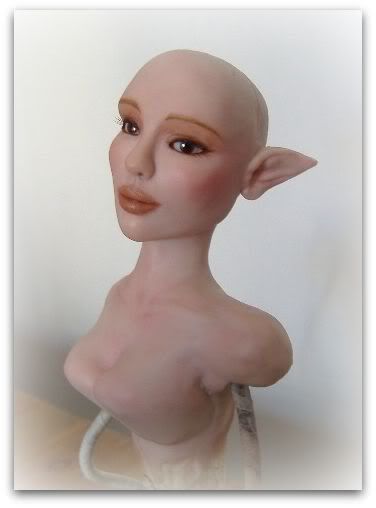
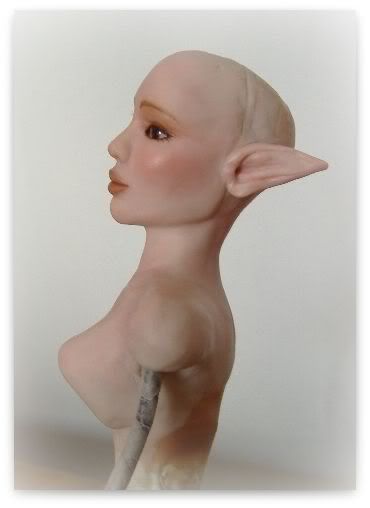
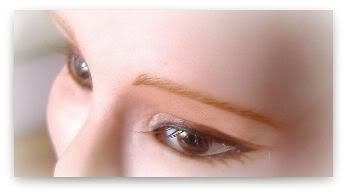
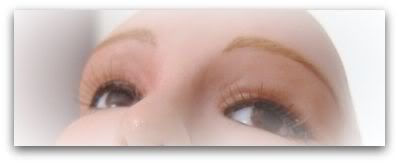
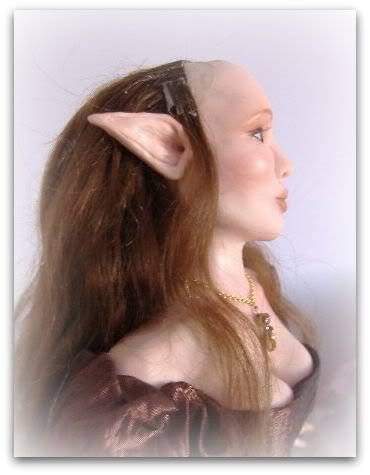
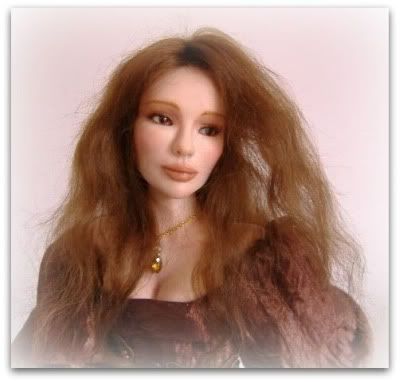
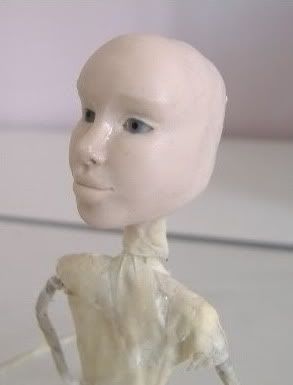
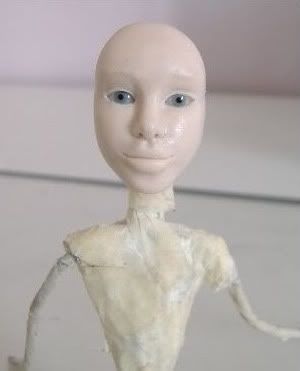
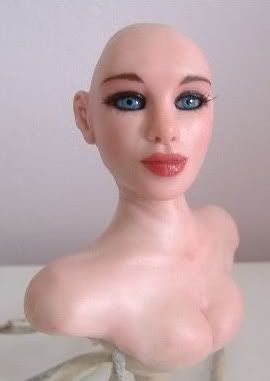
The face of my fairy, after several hours of work was painted. Although photos can not be seen well below the lashes were painted, while those above were made instead of false eyelashes. Just to give you an idea of \u200b\u200bthe size of the head measures almost 6 cm. in height.
Add two photos where you see the best I've applied the false lashes on the top of the eye.
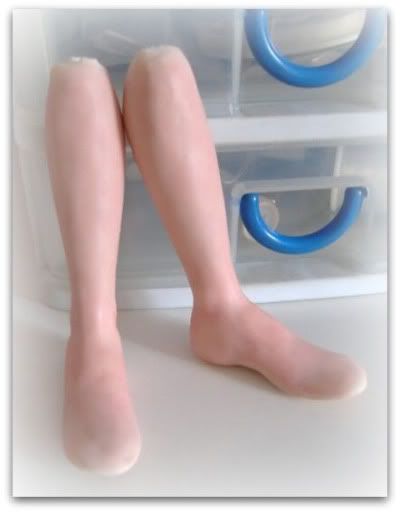
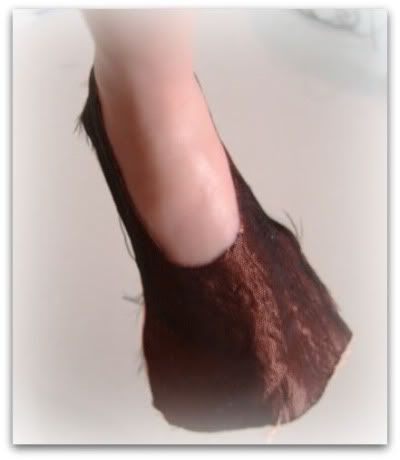
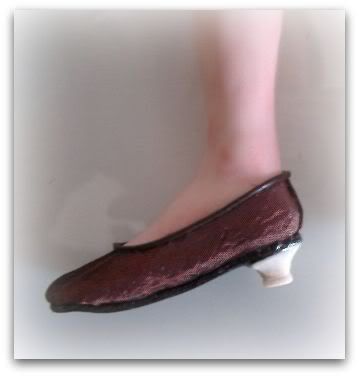
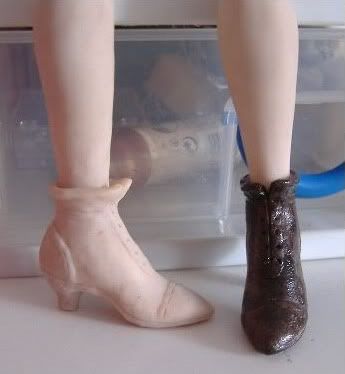
First of all, I did my legs and then I sketched the walk, I made my first little mistake, I made a form similar to that of a foot and I did not, I had to make a form more like that of a shoe.
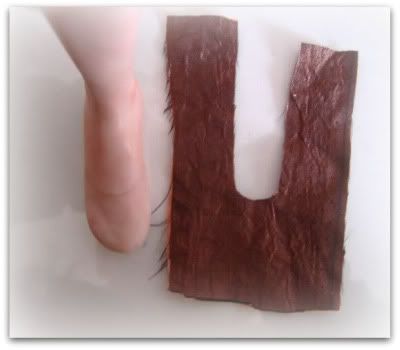
To make the shoe I left a piece of cloth in the shape that you see in the picture below. I made a mark with a pencil on the neckline of the foot to aid in positioning the fabric on the foot. I put the glue, but not much, because in these cases must be very careful that the glue does not pass through the fabric or otherwise ruin all the work, so you should be able to dose the required amount in the right way, it is best to draw the glue that puts you, so that it is only a very thin layer.
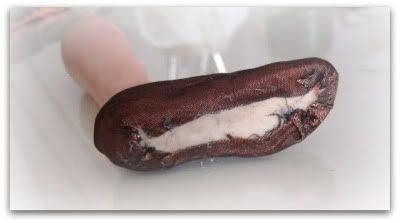
Below you can see two phases of the placement of fabric on the foot.
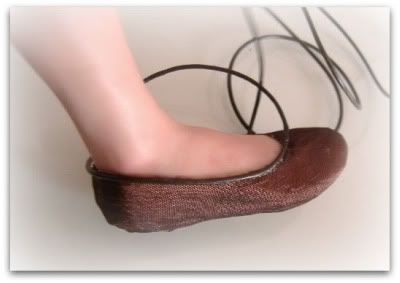
Now to finish the whole neck of the shoe I used a brown leather cord those who are used to make necklaces. Here too it is very important for determining the glue not to get all the work done so far.
At this point, because the shoe has been designed to have a small heel, I started to create the wedge with polymer clay, but a small problem arose, I could not in any way to do heel.
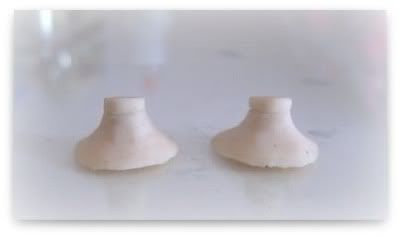
So I was forced to insert a piece of rigid metal wire at the point of the heel. I therefore had to first make a small hole in the not too deep below the shoe, just to insert and glue the metal wire. On the edge of the metal are thus able to shape the heel.
Using this system are able to model directly above the heel of the shoe as you can see in the picture below. Even here, however, created another problem, I did not know how to cook heels made with polymer clay.
I was very undecided about whether to put in the oven, hoping that will not ruin the leather and fabric, but I was too afraid of ruining all the work, so I decided to dry a little heel with Hot Gun (which is a gun sends out a very hot air).
Then, since I wanted to be sure that the heels remain firmly attached to the shoe I decided to take it to attack a second time with the glue, so I did a little lever carefully and took out both heels and I've cooked in the oven safely. You can see her heels in the second photo straight from the oven!
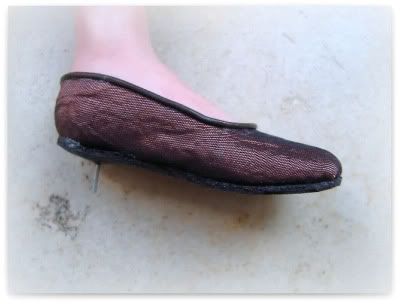
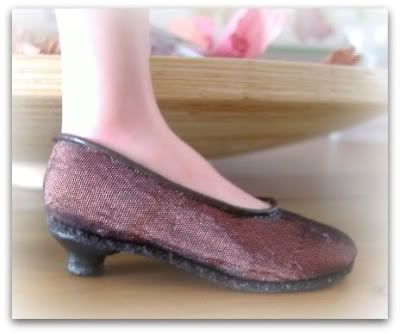
Then I simply glued to the shoe heels, and I colored them. Below you can see one of the shoes over. For the moment the job ends of the shoes here, then once the fairy's dress will be finished decide whether to put the shoe on the front of any particular type of ribbon or beads etc.. or not.
There must also be said that the shoes so you will not see the dress because the cover, but a small detail, however, make sure your shoes more finite.
Finally I must say that system I used is not very fair, if you want to make a heel a bit high you can only create with polymer clay and then in this case it was better or make the entire shoe with polymer clay or at least create the sole of shoe with polymer clay, so you do not have the problems I had.
If I created the sole with the heel of polymer clay that would adhere well to the sole cook and I would have been directly in the oven, of course I had to add at a later time, the skin of the neck strap of the shoe.
At this point we get to body building, the first step is to enter and then glue the arms and legs sull'armatura.
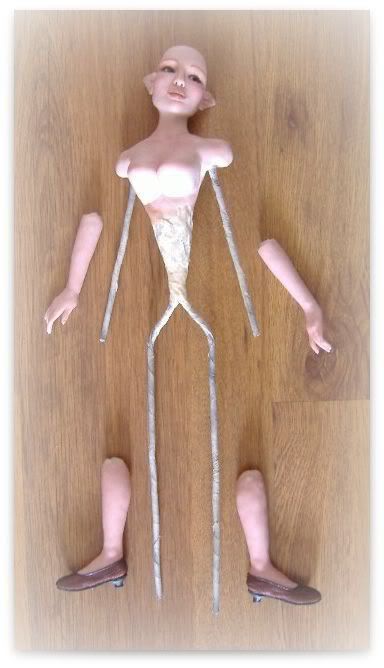


A questo punto bisogna usare un tessuto sottile che abbia almeno un lato elasticizzato (tipo il jersey) e con questo tessuto coprire tutto il corpo creato con il Polyfill. Io nella foto potete vedere che ho usato un tessuto di color carne, ma questo non è assolutamente obbligatorio, considerando che la fata avrà poi delle mutande lunghe e un vestito lungo che coprirà il tutto.
Il busto di questa fata devo dire che mi è venuto un pò troppo lungo, ma una volta che inizierò a vestirla cercherò di mascherare il difetto.
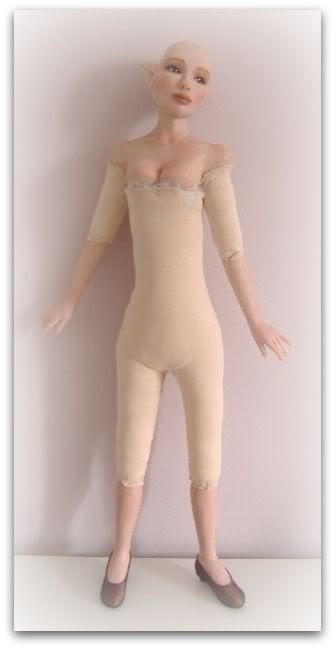
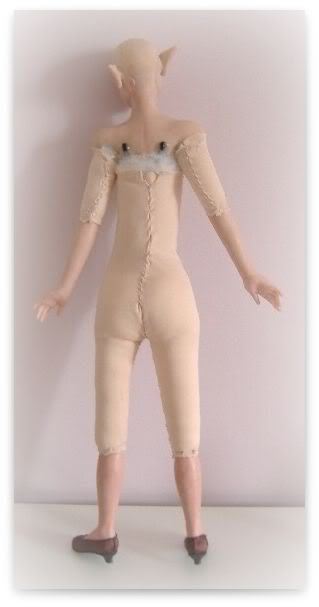
After the first phase of armor, here is my beautiful fairy with her grandmother's underpants!

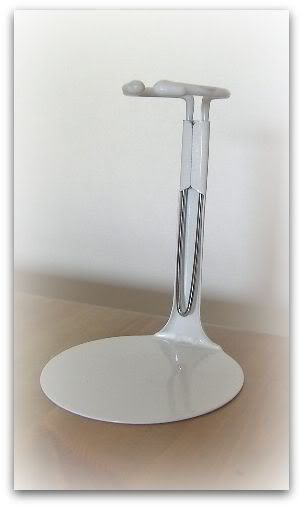
At this point my fairy will stand with support for dolls like what you see in the picture below. This sculpture is a "posable doll" and then wanted the sculpture will also be put in a sitting position.
One of the first steps is to create the skirt of her dress, this step is quite easy for those unfamiliar with the cutting and sewing.
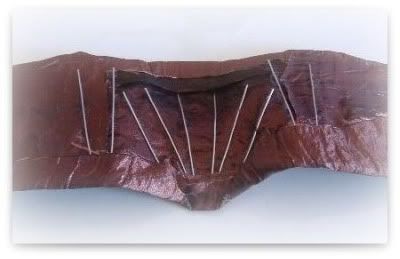
At this point we get to creation the bodice, this is a step a bit more complicated, frankly I do not use patterns or anything, but I do everything by eye and by taking action directly on the sculpture, as you can see in the picture below I have created some of the slats with metal wire and then I have pasted on the bodice, the sticks are used specifically to create and shape of the bodice, because when you apply the bodice on the sculpture to give you a nice shape without a little pinch and the slats can not do it.
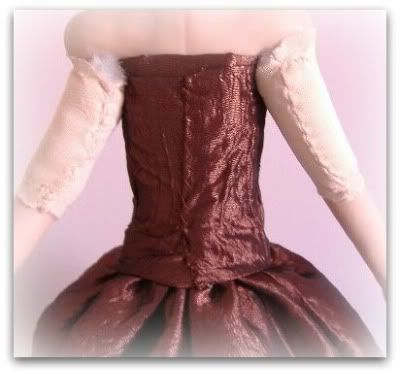
After much patience and work I put the bodice pasting it directly over the sculpture, while for the reverse I shook the whole sewing with thread, as you can see in the second foto, ovviamente così come è non è finito, la cucitura dovrà essere poi nascosta da qualcosa.

Bene, la parte del corpetto è per me quella più complicata, a questo punto ho fatto le maniche che sono molto semplici da fare. Deciderò poi in seguito se stringere le maniche con dei lacci come ho fatto già nelle mie altre fatine oppure no.

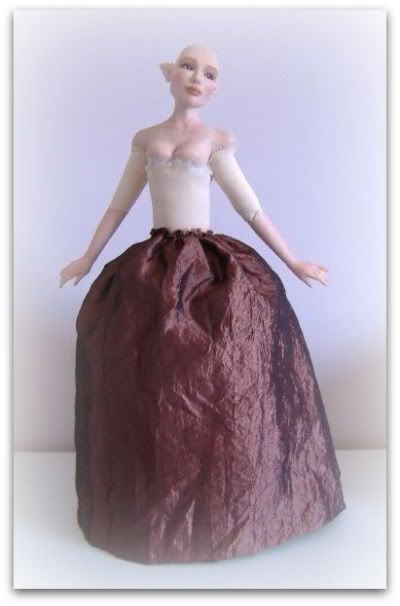
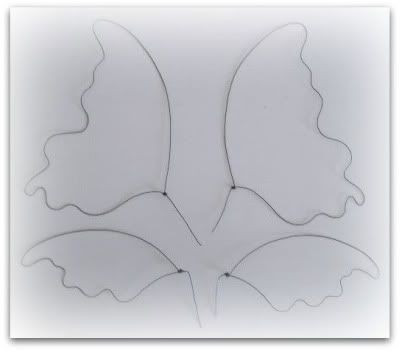
Il vestito quindi è quasi finito, adesso devo decidere quali particolari inserire per renderlo più prezioso e interessante. Intanto nel frattempo mi sono messa a fare le ali, ero indecisa su quale tipo di materiale usare per farle, ma poi vista la misura abbastanza grande delle ali ho deciso di optare per quelle solite in organza che rimangono leggere.
Così aiutandomi con un disegno creato da me ho fatto la forma delle ali usando un filo di metallo.
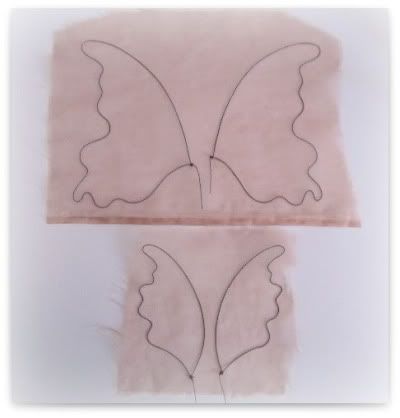
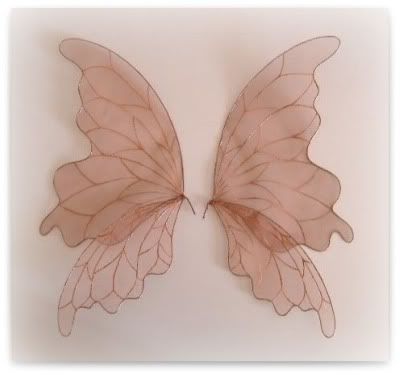
Poi ho preso dell'organza del colore del vestito e ho applicato con la colla i quattro pezzi di ali fatte con il filo di metallo, fatto questo ho poi tagliato a filo bene il tessuto e ho creato le venature a mia fantasia usando un colore a effetto rilievo di quelli fatti apposta per le stoffe. Per finire ho unito le ali piccole con quelle grandi attorcigliando i rispettivi fili di metallo insieme.
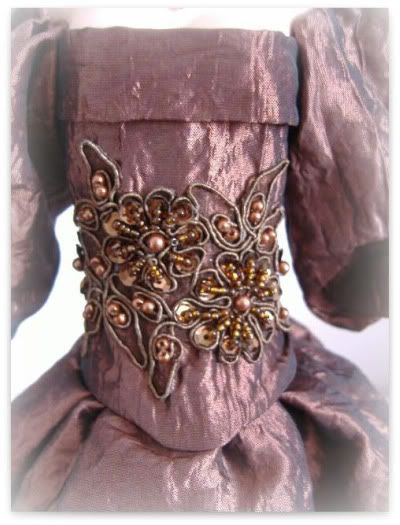
Finite le ali sono andata a cercare qualcosa da inserire sul corpetto e alla fine in una merceria ho trovato una passamaneria proprio dello stesso colore del vestito, essendo un pò grande alla fine ho deciso di metterla tutta attorno al corpetto, poi infine ho aggiunto anche un bordo creato con lo stesso tessuto del vestito sulla parte superiore del corpetto, perchè così mi sembrava più finito il tutto
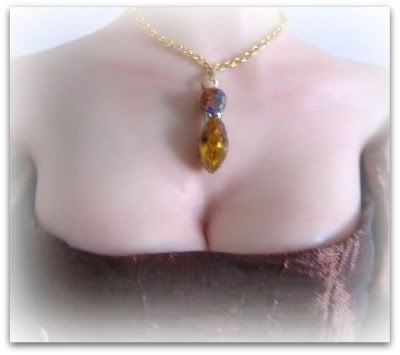
Questa volta ho fatto un giro al mercato e ho trovato degli orecchini pendenti in tinta con il vestito, tagliando i vari pezzi di questi orecchini pendenti ho creato un ciondolo per la mia fatina, usando una catenina di colore oro che avevo già in casa. Per tenere insieme the piece of the chain earring I used a thin transparent sewing. Everything was then carefully pasted on the body.
Always with a few pieces of the same earrings I bought at the market finished shoes and I added some leather straps cross.


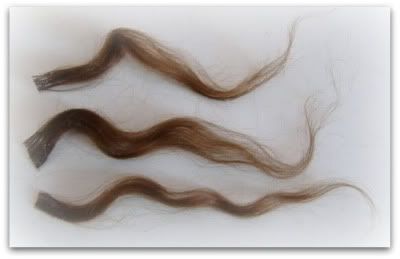
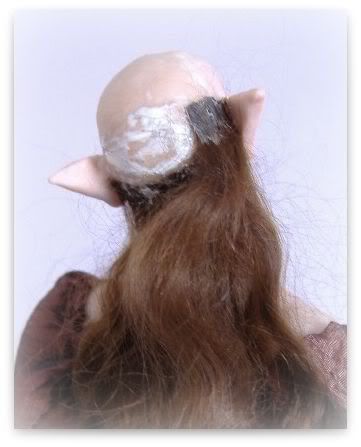
At this point, because I was undecided on how to finish the sleeves, I decided to leave it unresolved, and so I started to apply the hair. For the hair I left a tangle of hair mohair those made especially for hair to create the dolls, you can see in the picture.
Then from I skein neccessarie marched all the strands to cover the head of my fairy and I glued the base of each strand, in the second picture you can see some of the strands preprarate. I forgot to say that I chose for this fairy wavy hair.

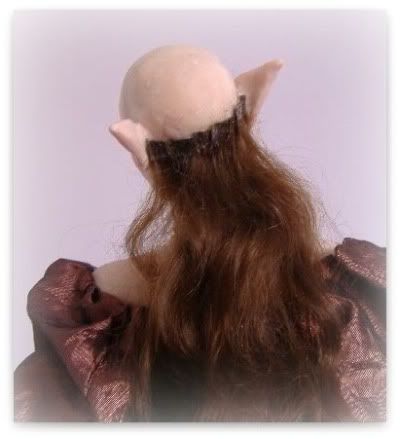
At this point I started to apply all the various strands in the first picture you can see that the first line of hair was applied. Then after you pass the second line of locks and then continue with the same method until you get to almost half over the head. At this point we apply the hair on the sides of temples.
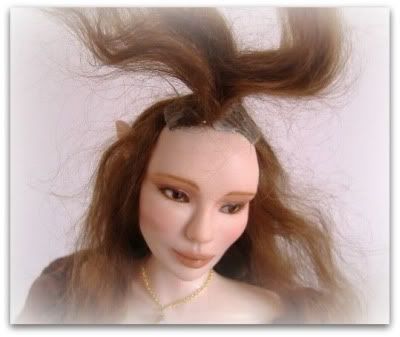
At this point begins the most delicate part of the job, because you have to prepare two strands much larger than those made so far, these two strands will eventually our hair, you will be able to apply the locks without showing the glue and of course this is a job that requires care and precision.
In the photo below you can see that has been applied to the first lock, this lock will be beamed and carefully pasted on the opposite side.
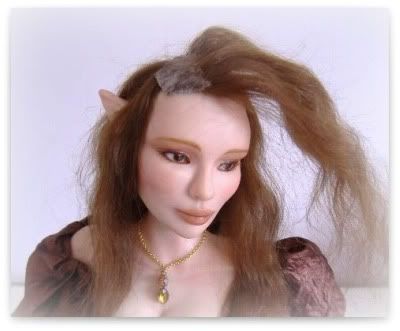
Below you can see that the second strand has been applied, now goes to the stage where we must be able to make the entire length of these two strands firmly attached and close to the head.
To do this initially only apply glue on the top of the head as you can see in the second photo below. In this phase must be very careful in determining the right way not to squeeze too much glue and hair when you directions to make them adhere to the head, because the glue does not have to go through all the hair.

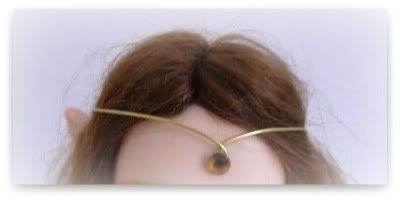
Here the strands are arranged, even if that right is not yet fully bonded well. However, as I have in mind that my fairy godmother will make a small tiara very simple, settle down poi in seguito meglio i capelli.
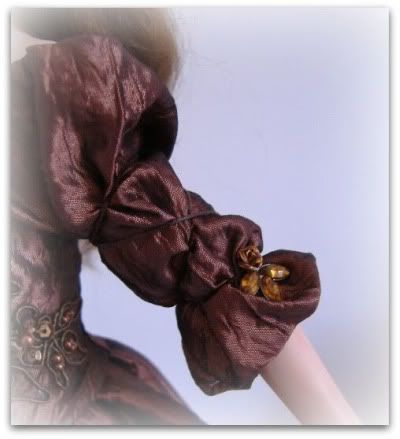
Alla fine ho deciso di non lasciare la manica larga, così l'ho stretta a incrocio con un laccio di cotone marrone e ho applicato un accessorio che faceva parte sempre dello stesso orecchino che ho usato per fare la collana e per impreziosire le scarpe.
Anche la tiara è fatta, è molto semplice come avevo detto, l'ho creata usando un filo di ottone e applicando un piccolo cristallo.
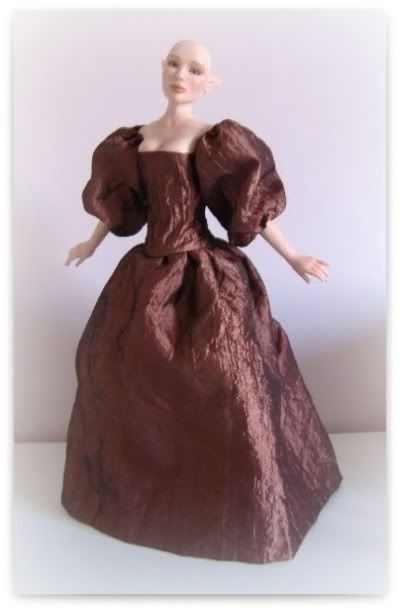
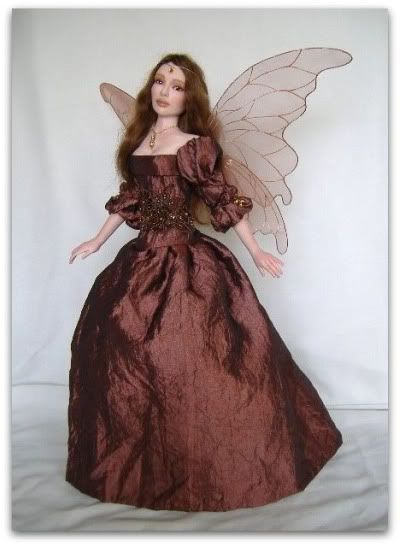
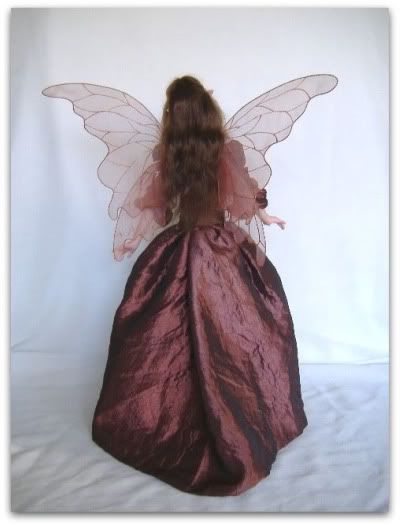
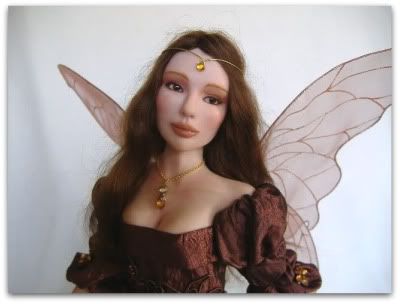
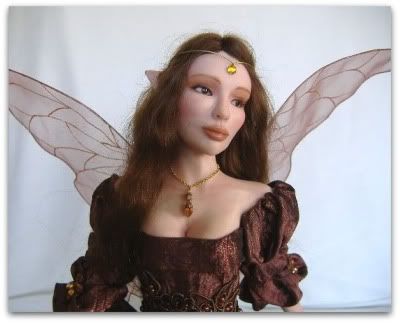
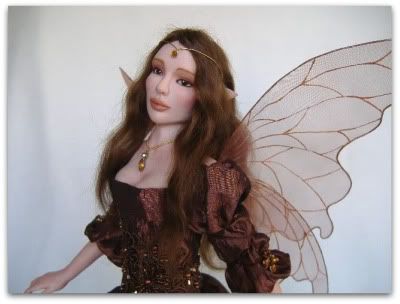
L'ho chiamata Aryan.

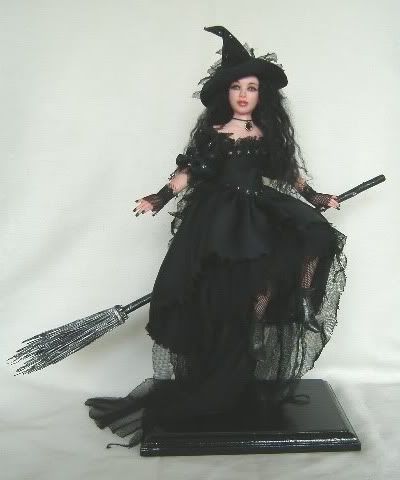
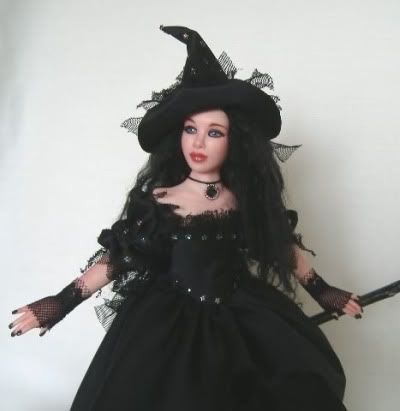
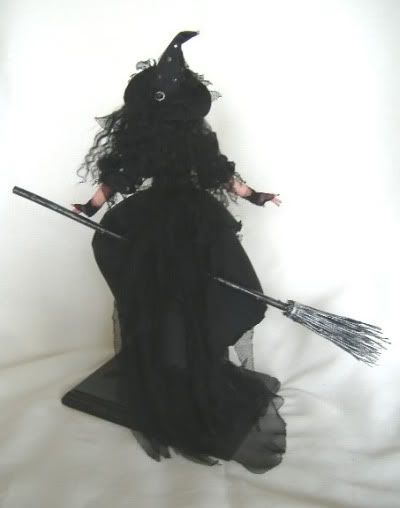
Each time you should also change, and so after all the fairies I decided to make a good witch flying on her broom! I want to add photos of some small steps in the creation of this sculpture. The height of the witch is about 25 cm.
The pulp used is the color Prosculpt Light. Honestly I did not know how to make it fly, then browsing around the web I found a photo of a beautiful sculpture of an artist that helped me figure out how to do the job.
First of all some photos of the modeling of the head. Below you can see the head still in process. I used eye glass mm. 5 because I had that big beautiful eyes, the right size for inclusion was in fact the eyes of a millimeter. 4.
Here it is just out of the oven.

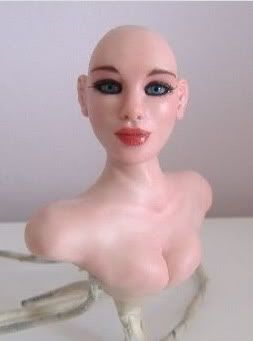
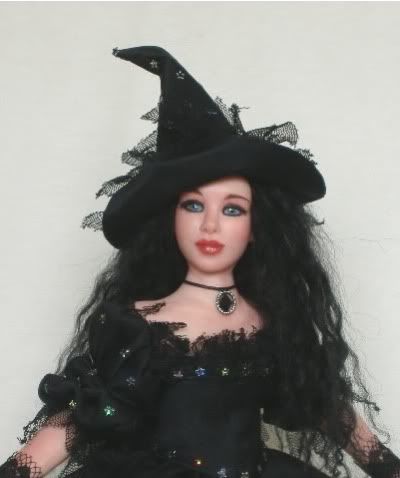
Below you can see some photos of the painted bust. When I started doing makeup to the eyes has presented a small problem, the more I did the black makeup and heavier and the blue eye became increasingly clear in the end my witch had a look possessed! So I was forced to paint an outline of dark blue around the iris and the situation has improved. Even her eyes seemed too large, it is true that I wanted them big but not so much, then adding false eyelashes at the top finally eyes seemed a little less great.

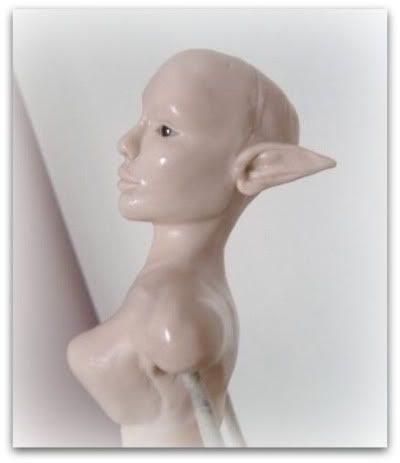
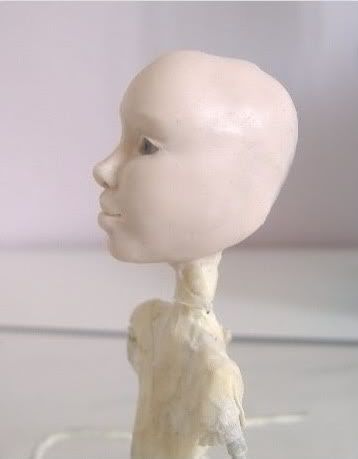
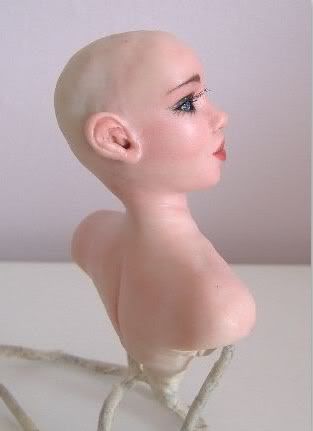
Below you can see the photo of the sculpture in profile and thus also the ear, which I wish to state is not modeled as it should be a real ear, because until this now I have always done fairy ears that are made in a rather sketchy and fanciful, but here I should do a real human ear, but having never been in trouble and I found myself wanting to continue working in his ear to me are a bit 'invented! ! Of course sooner or later I'll have to learn how to do an ear good human being.
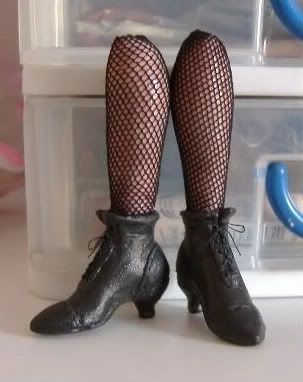
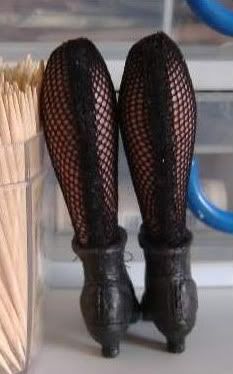
Then I went to the creation of half legs and shoes. I decided to make the boots with lots of strings. I have not had great difficulty in making boots. To put the loops I used a simple black cotton thread for sewing, I inserted and glued in the little holes in the various bits of wire, creating the intersection and then I made the closing the shoe, creating a bow which I then glued onto the shoe, then to maintain the shape of the bow open and rigid I put the varnish on the cotton thread.
For socks I used an elastic network that I had at home, I stuck one hand on the back of the leg then I pulled the fabric around the leg by stopping with the glue and then I combined it all behind, to cover the I used a seam behind black lace border, the border is a bit 'off but you can not work miracles!
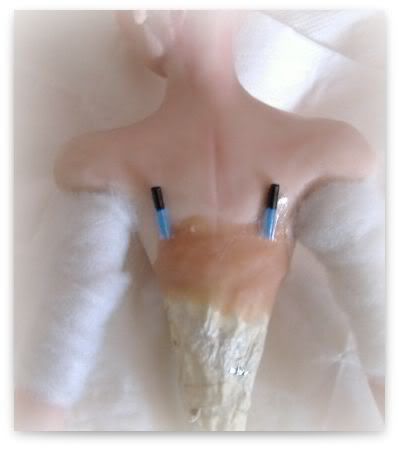
then I did the half arms and hands and I joined as always on all the armor, but of course I had to first think about how to do my flying witch, so before going on to fill the frame as you can see in the picture below I used a hollow tube of brass 6 mm to the torso armor and calculating also the padding final (since it will end in his own back) I left the pipe a little 'longer.

finished making the filling of the body and how was the hole in my projects has been caught in his own back, so I sewed the pink jersey and shorts then the blacks leaving a hole in its fabric to pass around a brass tube of 2-3 mm, around the holes in textiles took me a while ' a transparent glue to glue the side and at the same time not make the ladder materials.
Then I took an aluminum tube filled with 4 mm. and I started to bend it in the form you see below, it was not easy because it is very hard to bend in the right form parties so close together, but eventually I made it there. I had previously prepared hole in the wooden base when it was not painted yet, so I then inserted and glued to the aluminum tube well and I tried to put on the witch, and fortunately the job done was correct, my little witch would finally flew on her broom!

Once the entire process of dressing is the time to create the famous witch hat and end with a very useful tutorial found on the internet was not as difficult as I thought.
To make the hat I used a tutorial found on the site www.ginabellousdolls.com.
I used the same material of the dress and a heavy cardboard 200 g. I am not successful the first time since before I had to find the right size pattern and then I have tested with plain paper, but once you understand more or less the proceedings and with my small staff are able to change it and I think which is not bad at all came.
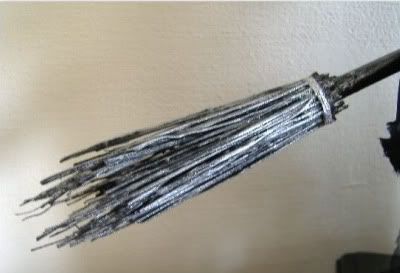
For the broom I did not have need any tutorial, I simply took a piece of wood the right size in a park to create the handle, then I bought a real small broom sorghum and I cut the pieces needed for sorghum and I've pasted a bit 'at a time around the handle wood until you reach the desired size, then I painted the handle is black with the sorghum acrylic paints, but then I decided to silver plate the last part of the sorghum because otherwise there was not even a dot of color.
The broom was then hand-sewn on the dress so that you could see the seams so that the broom to take a certain angle.
Below you can see the detail of sorghum at the end ho deciso di colorare d’argento.
Ed ecco finalmente la mia strega Morgana che vola sulla sua scopa, purtroppo la foto della figura intera non è il massimo, ma meglio di così con la mia macchina digitale non riesco a fare.
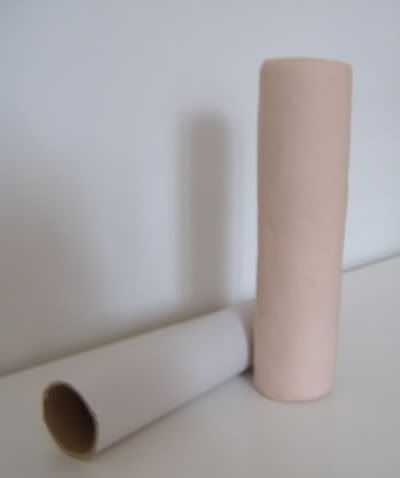
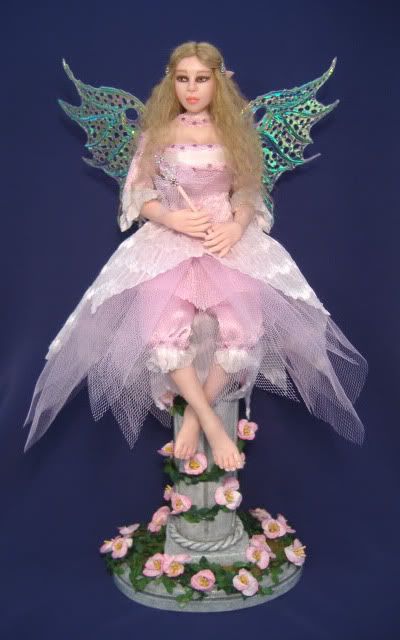
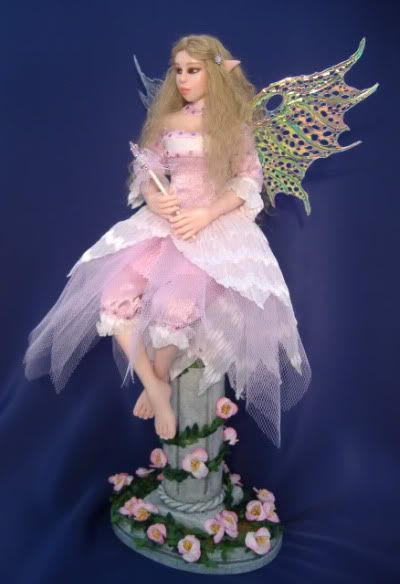
Laila è una fatina che si riposa su una colonna di marmo. Prima di tutto qualche foto veloce in cui potete vedere come ho fatto ha creare la colonna.
Sono partita da un very stiff cardboard tube that I filled with the foil, one that is used for cooking, even the cardboard tube I used was that of the foil.
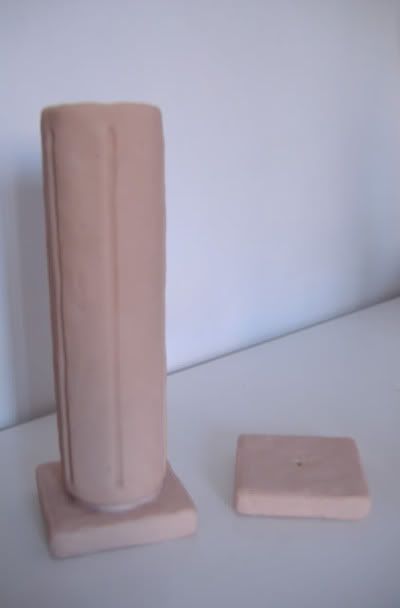
The reason I filled the box with aluminum pressing it very well is because then I had to enter both the top and bottom of a brass tube and then the fairy to sit safe and secure with more security column below. Without this I put a layer of polymer clay and I cooked.
Then I put a second layer of dough at this point I started doing the final model. I then created the two pieces above and below and remember to leave the holes for brass tubes, I glued the two squares with fimo decorating gel and cooked, yet the piece. I then finished creating a braid around the column and finally I gave the last area.

The use of polymer clay rose was only my choice, but honestly it would be better to use a paste already white or gray, but at this point I had to go to the color of ' entire column using acrylic colors. I then pasted the column on a wooden base covered with moss.
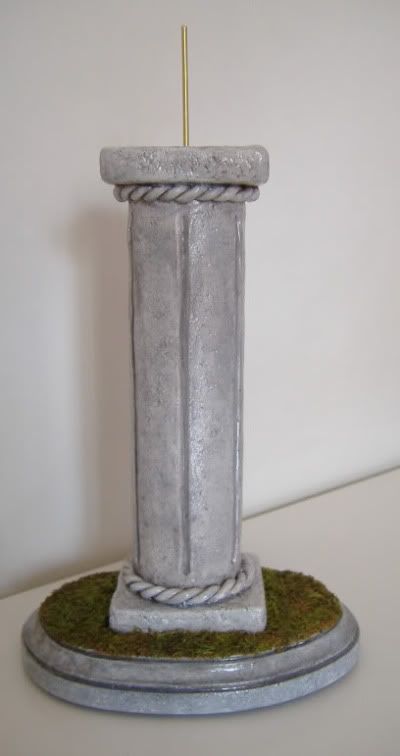
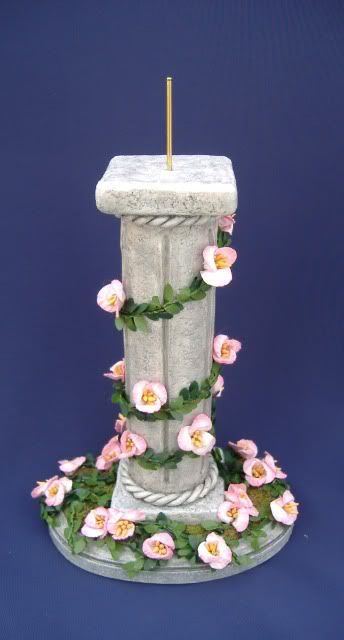
And here's the finished column that I decorated with paper flowers e una finta pianta rampicante.
Ed ecco Laila sulla sua colonna! L'intera scultura è alta circa cm. 33 mentre Laila se fosse in piedi sarebbe alta circa 25 cm.


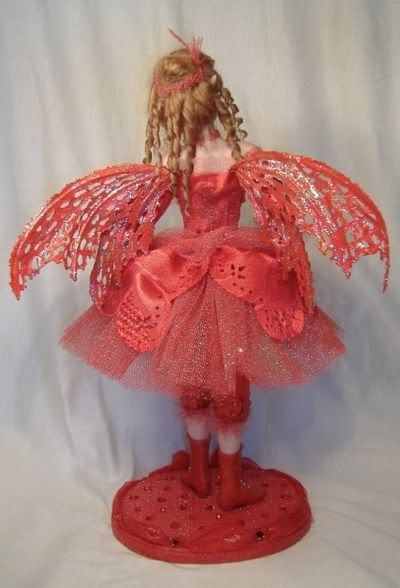
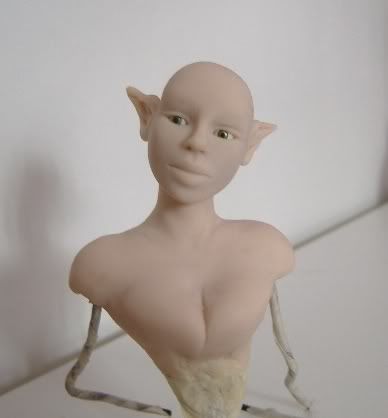
Sarà una fatina vestita di rosso, questa è l'unica cosa di cui sono sicura per il momento...........dimenticavo avrà anche le lentiggini!
Eccola qui appena uscita dal forno^_^
And here it is finally painted.
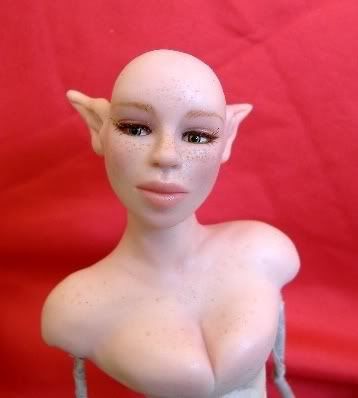
And then will also have the can-can style boots ................... obviously red!
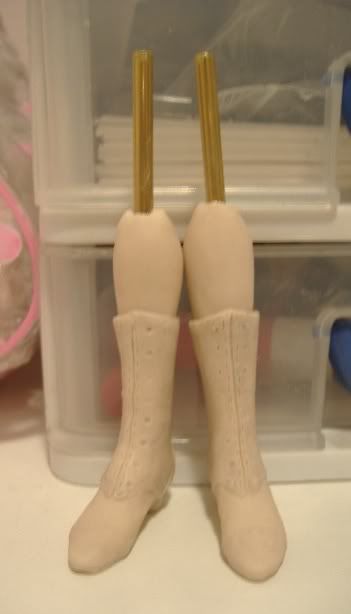
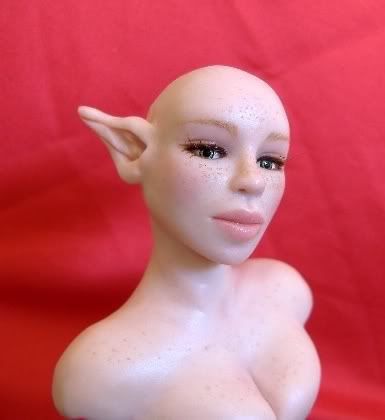
I finally finished the hands and boots!

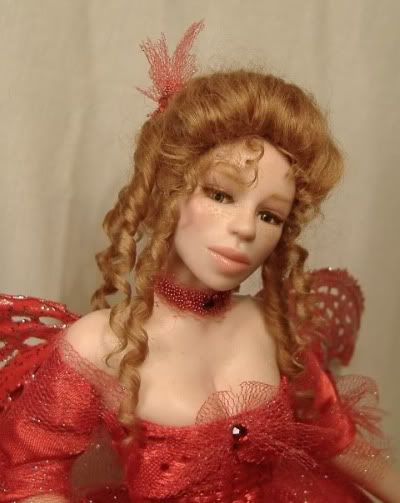
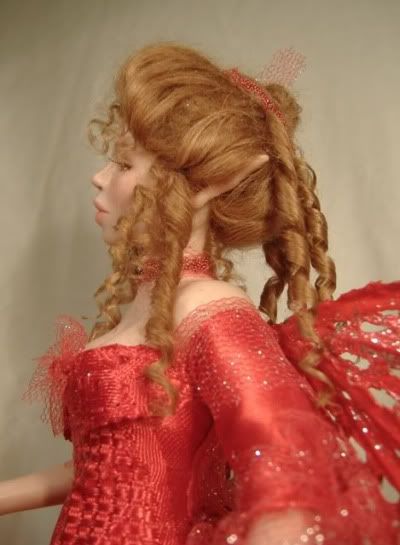
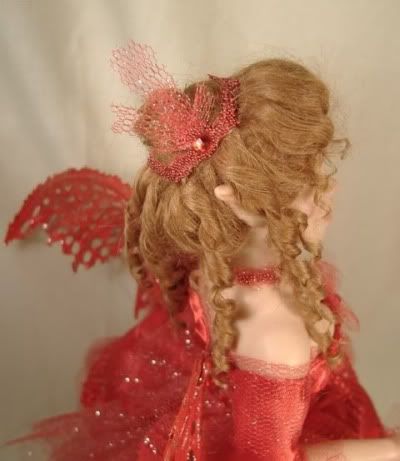
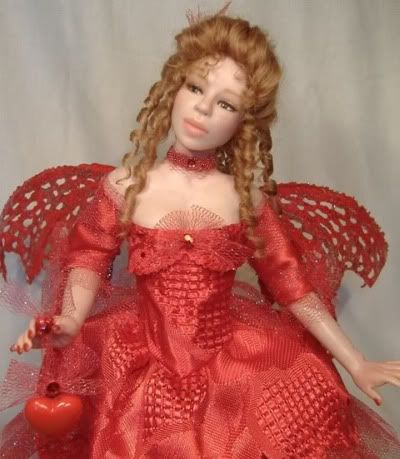
And finally after many hours of patient work is over my fairy! I called Scarlett.
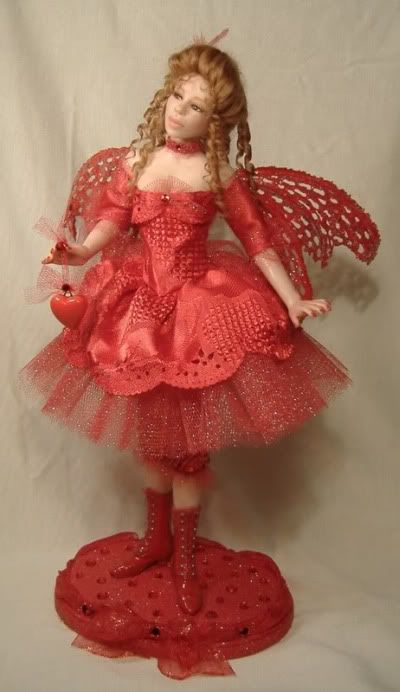
I must say that being able to make the hair was a real satisfaction! It takes time and patience but also very much ..................... for a change!